No products in the cart.
Epson R3000 review Part A
Firstly where does the Epson R3000 fit into range , it will be a direct replacement for the R2880 we believe. Mainly because it is such superior printer to the R2880. And the fact that they considerably less expensive to run due mainly to the 25.9ml cartridges.
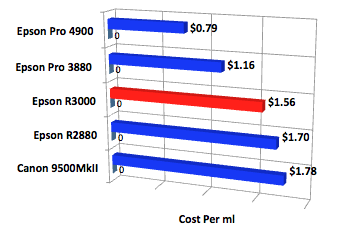
To give you a little insight into the running cost on Epson and Canon equivalent printers see graph below.
 These costs are based average buy prices on genuine cartridges. As you can see the R3000 is some 12% cheaper than the nearest Canon competitor . And is at least 10% cheaper than the other other A3+ printers in the sample. The Pro 3880/4900 still represents the best value for a desktop printer.
Unpacking the unit we see that it comes complete with roll media attachments and CD/DVD media tray. This offers a little more functionality than the much loved Pro3880. The other thing is that the cartridges that come with the printer are the full 25.9ml not a half size, well done Epson. There are 9 cartridges PK, LK, LLK, C, LC, VM, VLM, Y and MK. The size of the cartridges also leads us to interesting conclusion. Exactly what volume ofink do you get when you first purchase the printer?

The R3000 is the best in this area over the two other A3+ printers sampled. Put simply you get an extra $200.00 worth of ink over the R2880 and some $ 115.00 worth over the Canon 9500MkII. The two larger printers represent the best value over all with the Epson Pro 3880 coming complete with $835.20 in ink and the Epson Pro 4900 coming complete $869.00 worth of ink. You should consider this when purchasing a printer as it may mean the over all cost of the printer is ink component.
Using the Epson R3000 is a simple process everything you need to know about the setup, loading media and changing blacks is all on the huge 2.5″ screen. We’ve given some examples below.
 This is the start up screen, which clearly layout your ink levels and also the type of communication. In the this case its the wireless option that works a treat. Do remember that you can only select one type of communication. We’ve been running it wirelessly for the last 2 months and it hasn’t missed a beat.
From here we simply go to the large OK on the toggle to get in to the rest of the menu.
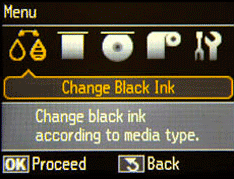
 The first menu that comes up is the black change over that allows us to change over to what ever black ink is suitable for the media in use.
 The next screen is loading Thick media menu. This allows us to select the type of thick media. Your choices are
Fine Art Media ( 0.3 to 0.7 mm)
Poster Board ( 0.7 to 1.3mm )
Once you select one of these options the screen will take you through step by step on how to load the media. If you follow these instruction you just won’t have any problems loading thick media.
 The next screen is loading CD and DVD media. Again if you follow the screen prompts you wont have any problems.

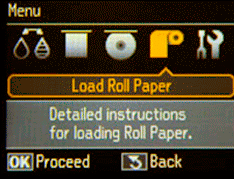
Loading roll paper is the next screen again simply follow the prompts and is seamless loading. This makes doing panoramic prints a breeze, the max length you can print is 111.8cm ( 44″ ). which gives a approx a 1 to 3 ratio which is perfect for most pano’s.
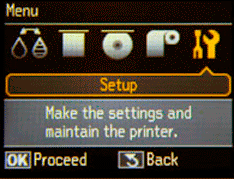
 The last of the menus is Setup, again simple instructions easy to follow.
Maintenance : For Nozzle Check , Head Cleaning and Cleaning Sheet
Printer Setup : For paper skew, and Plate gap.
The Platen gap can be very important if you doing thicker media
Network Settings: this is where we setup our Wireless or Ethernet network settings.
Watch out for Part B of the R3000 review
Dont forget about the super special on the R3000 click here for more details
