No products in the cart.
Epson R3000 Review revisited
After spending well over a year using the R3000 we thought it was worth revisiting our original review and adding in some further observations re the Epson R3000 printers. Lets start by saying Team Digital sells more R3000 than any other Epson printer. This could be due to price point as much as anything, but it also has to do with the quality of the output. The Pro 3880 runs a very close second due mainly to its running costs and A2 capabilities.
There have been a lot of tests done online as to printing costs. Those tests would indicate that the running cost of the Epson R3000 is as good if not better than its Canon or HP equivalent models. Obviously the print cost of the larger capacity printer are better ie the Epson Pro 3880 and Epson Pro 4900. And with Team Digitals extremely competitive pricing on genuine Epson cartridges, all of our Epson printer printing costs are reduced even further. Click here for the latest cartridge pricing.
Unpacking the unit we see that it comes complete with roll media attachments and CD/DVD media tray. This offers a little more functionality than the much loved Pro3880. The other thing is that the cartridges that come with the printer are the full 25.9ml not a half size, well done Epson. There are 9 cartridges PK, LK, LLK, C, LC, VM, VLM, Y and MK. The size of the cartridges also leads us to an interesting conclusion. Exactly what volume of ink do you get when you first purchase the printer?

 There were some things we didn’t like about the printer when we first got it, but now we love the feature. The main one being the manual front load for fine art media or poster board media up to 1.3mm. This loading feature gives us a correct load every time if you just simply follow the instructions on the big LCD. Unlike some of the other models that Epson have brought out like the R2400 and R2880 which were hit and miss at best when it comes to loading fine art or thicker media.
The other was the simple roll feed which allows us to print up to 111cm prints. That’s one long pano. The equivalent Canon printer can only print a max of some 67cm in length. And even the Pro 3880 can only print 95cm in length unless you use the fantastic Mirage Print software which then allow you to do what ever length you want.
The other feature which has stood out is the wireless. We have been running the this particular print through wireless only since we have had the unit. It hasn’t missed a beat. We have actually printed directly from mobile phones as well this work beautifully through the Epson iPrint app.
We love the new head and capping on the R3000. Meaning we can leave the printer off for weeks at a time and not have to even do a nozzle clean when we start up. This is a big step forward for Inkjet printers. So if you are someone that doesn’t require much printing, but wants the control that printing at home gives you, this is a big step forward . We still recommend that you do fire the printer up once a week if possible, but if you can’t then the chances are the R3000 will be just fine.
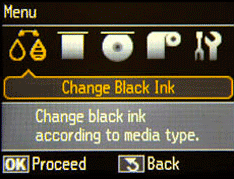
While we would like to see some sort of auto black switching that doesn’t use ink during the switching process. We have found you can manage the process by not switching to often. Meaning setting up for a photo or matte black for a period not changing from to another. There is also another way of minimizing any waste during this process. You can use an economy flush which you do in the Setup options on the printer itself, there is a Black Ink Change setting that lets you select between this Standard flushing and an Economy flushing that only uses one milliliter to flush Matte Black instead of three milliliters.
We have thrown all sorts of media from Pearl , Canson fine art ,even poster board and the R3000 handled in its stride. We did have some problems with canned profiles from some manufacturers. After we wrote our own profiles its was printing perfectly.
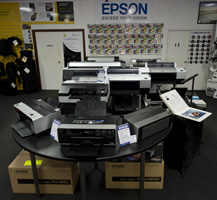
In conclusion, from a printer that we weren’t overly excited about when it was first released. After using it for over a year we have acknowledge that the Epson R3000 is one of the best printers Epson have released. It’s still compact enough to fit on a desk and the build almost feels like one of there Pro range. The image quality is superb in colour or black and white. We love the larger cartridges, not changing them as often plus the extra economy. And feeding the printer is a breeze, whether its fine art or poster board. The wireless has run without any issues since we first installed it. The ability to run it on a network is a big plus as well. As we said earlier the capping unit is excellent, we have done so few head cleans even after leaving it for a few weeks. This printer has it all, while not perfect we can see where some changes could be made to make this printer even better. We highly recommend the Epson R3000 just as it is. If you want to see it action for yourself call into the Epson Touch Centre at Team Digital, which boosts the largest range of Epson Pro Photo printer in WA.
Using the Epson R3000 is a simple process everything you need to know about the setup, loading media and changing blacks is all on the huge 2.5″ screen. We’ve given some examples below.
 This is the start up screen, which clearly layout your ink levels and also the type of communication. In the this case its the wireless option that works a treat. Do remember that you can only select one type of communication. We’ve been running it wirelessly for the last 2 months and it hasn’t missed a beat.
From here we simply go to the large OK on the toggle to get in to the rest of the menu.
 The first menu that comes up is the black change over that allows us to change over to what ever black ink is suitable for the media in use.
 The next screen is loading Thick media menu. This allows us to select the type of thick media. Your choices are
Fine Art Media ( 0.3 to 0.7 mm)
Poster Board ( 0.7 to 1.3mm )
Once you select one of these options the screen will take you through step by step on how to load the media. If you follow these instruction you just won’t have any problems loading thick media.
 The next screen is loading CD and DVD media. Again if you follow the screen prompts you wont have any problems.

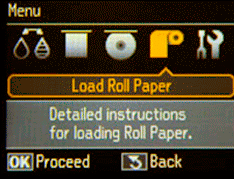
Loading roll paper is the next screen again, simply follow the prompts and is seamless loading. This makes doing panoramic prints a breeze, the max length you can print is 111.8cm ( 44″ ). Which gives an approx a 1 to 3 ratio, which is perfect for most pano’s.
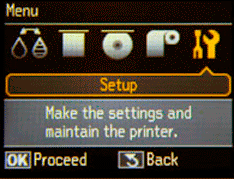
 The last of the menus is Setup, again simple instructions easy to follow.
Maintenance : For Nozzle Check , Head Cleaning and Cleaning Sheet
Printer Setup : For paper skew, and Plate gap.
The Platen gap can be very important if you doing thicker media
Network Settings: this is where we setup our Wireless or Ethernet network settings.
